Collections Management
In the museum industry, we revolve around our collections. Most museums do. I think all museums should. The other stuff – events, tours, exhibitions, etc – is important too, but the collection is where the rubber meets the road. It is a universal belief that museums have “old stuff”, right?
The Mysterious Old Stuff Museums Are Made Of
What we commonly do with that old stuff is not fully understood by the guy on the street. He just doesn’t know, and why would he? It is rather industry specific, the things we do. The materials are unusual. The procedures are unfamiliar. The entire methodology behind collections management – this is what we call it – is not really intuitive to the normal person. (I use the word normal here, because museum folks are not normal. We really aren’t).
A non-museum person wouldn’t even know where to buy the tools or materials we use in daily collections management work. Actually, thanks to Amazon this might not be the case anymore. Let’s say they wouldn’t know WHAT to buy, or what to do with it.
I would like to help with that! We are more than happy to advise any member of the public who wants to care for their personal historic or artistic objects. You can walk them in, and we will happily advise you. And if you live in Dallas or Minneapolis or Basingstoke or something, this blog post might be more cost effective than paying for transportation down here to Brenham, Texas.
In this post, we will cover the topic of archival and non-archival containers and offer some how-to information on setting up your own collections management. In subsequent posts, I will talk about other conservation issues.
Containers: History’s Receptacle
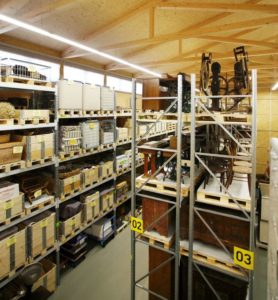
Museums use premium archival boxes to store stuff in. These are cardboard, with metal-reinforced edges. For an empty cardboard box, a museum could pay $5 for a tiny box. A really big box is going to cost $100 delivered. That’s an empty box, mind you. It’s a nice box, but I suppose it had better be for $100.
You do not have to buy these to responsibly store your family heirlooms. Yet, I am not suggesting using re-purposed copier paper boxes or shoe boxes. The cardboard in these types of containers is full of chemical compounds you really don’t want to come in contact with your family’s artifacts. These boxes are also acidic, and can physically damage just about anything you place inside them. That said, there is a very inexpensive alternative to those expensive, archival museum boxes.
Polypropylene: S’il vous plaît
Museums are increasingly relying on polypropylene containers, as metal-edge cardboard boxes continue to increase in price. I think the most commonly recognizable brand of polypropylene container is Sterilite. Walmart carries this stuff, though you can get it cheap on Amazon too.
Not just any plastic tub will do. It must be made of a stable plastic like polypropylene. To be absolutely sure, check the bottom of the container. It should have this symbol:
Polypropylene Symbol
Polypropylene also comes in various colors, and not all of them are archival-safe. Stick with clear or white, just to be safe.
The Dreaded Microclimate
There is a bit more to it, but it is easily sorted out. Sealing objects inside plastic containers can create what we call a “microclimate” within the tub. Objects can release their own harmful chemicals or even humidity. Trapping these gases inside a plastic tub will multiply and concentrate any negative effects. It’s important to prevent this. Thankfully, it’s rather easy. Take a drill (or an ice-pick, knife, or anything you can use to unceremoniously put holes in stuff) and put some holes in the lid. Then put some holes in the sides, but near the top of the tub. Now you will have little to no microclimate problems; and if you do, it will be seriously reduced.
Hole-y Conundrum! What’s The Answer?
Only one problem remains… now there are a bunch of holes in your tub! Water and insects can easily get into your precious cargo. First, I’d like to think that you aren’t storing these containers in your yard or under the carport. Don’t put them anywhere they may get wet. Remember the holes on the side are near the top; so, rising water will have further to go before it gets inside. It’s also a good idea to keep these containers off the floor. Put them on a shelf if you can.
Insects are a tougher problem and they will get inside there eventually. If you are very industrious, you can hot glue small circles of muslin over the holes.
Finally, it’s generally a good idea to place a barrier between an object and the container. This serves a couple of purposes.
- the barrier can act as padding
- the barrier is another layer of protection for the object
Great! What Type Of Material Do I Use For The Barrier?
In our next post, we will explain what you should use as barriers for object storage, how to wrap your objects, and even show how to keep them from touching each other.
Stay tuned!